Building a Gameplay Walk animation in Production: Method and Calibration
- Vanessa

- Apr 20
- 11 min read
When you start working on gameplay locomotion, there comes a moment when you realize the walk isn't just a cycle.
Well... it is a cycle, as long as nobody touches the speed, the idle, the transitions, the style… so never.
Because in reality, it's an animation that depends on external parameters that will inevitably shift during production.
A walk can't survive every change.
If the speed evolves, you'll need to revisit the contacts. If the idle changes, the posture will have to change too. That's normal.
But you can anticipate a large part of the problems.
And that's what makes the difference between a walk you're retouching for three weeks… and a walk that integrates cleanly on the first pass.
The walk is the balance point of the moveset. It's where you establish consistency with the idle, the sense of weight, the reading of effort, the distance of starts and stops, readability at ten meters, and the way the player will feel control.
And for all of that to work, it's not enough to animate "a walk." You have to build it in the right order, with the right reference points, taking into account the engine, the metrics, and everything that will connect to it later.
It's a question of methodology.
This article is about how to anticipate problems before they happen, and how to avoid the traps that force you to start over from the first pass.
Download the PDF — Building a Robust Walk (Essentials section)
4 pages for clean walk production: checklist, tests, red flags, cycle calculation.
A clear, professional, actionable tool to keep close when you're animating a walk.

Start with the Engine, Not the Walk
Before you start animating, you need to know the parameters that will define your walk: the actual movement speed, foot management in the engine, acceleration and braking distances, and how the character enters and exits the walk state.
Speed, in particular, is not something you eyeball. You calculate it.
The formula is simple:
cycle in frames = (stride length in meters / speed in m/s) × FPS.
This is a non-negotiable starting point: the entire locomotion system depends on this precision. A poorly calibrated cycle contaminates the starts, the stops, the transitions, and even the feeling of control.
And above all: these parameters are the only ones you can truly anticipate.
You can't predict style changes, design retakes, or narrative adjustments. But you can, and must, lock down the base metrics before animating.
That's what prevents you from redoing your cycle at the first integration.
Starting with the engine means setting the right metrics before animating, so your blocking already moves in the right direction.

The questions of root motion, foot management, and blending philosophy go beyond the scope of this article, they determine architectural choices that deserve their own treatment.
I covered them in detail in the previous article, if you want to lay those foundations before going further into the method.
Work by Iteration
In gameplay, you don't build a walk to be "finished" right away. You build a walk so it can evolve.
It's a V0: a clean first pass, clear, readable, with the character's intention.
Because at the moment you animate it, not everything is in place yet, the starts, the stops, the turns, the transitions, the blends… And it's only when everything is connected that you can truly judge whether your walk works.
A "closed" walk is one you pushed too far too soon: ultra-precise poses, worked overlaps, polished torso and hips details, refined timing.
As soon as a parameter changes (speed, distances, transitions), you have to redo everything, and you hesitate, because you've already spent too much time on it.
But a V0 walk is not an approximate walk. It's a correct, consistent, styled walk, just not yet polished. A first pass that lets you adjust the speed, the step length, the hips height, or the rhythm without breaking everything.
Concretely, that means:
you set clear poses and a readable intention,
you define the rhythm and the structure,
but you don't yet spend hours on: micro-rotations of the hips and torso, overlaps, follow-throughs, timing subtleties that are likely to shift.
In keyframe V0, you build the structure. In mocap V0, you often need to clean, clarify, calibrate, but again, this is not the final version.
Because you're not building an isolated walk. You're building a locomotion system.
And that system is built by iteration: you set a clean first version, you test in the engine, you add the other animations, you adjust, you refine, you raise quality progressively.
This workflow lets you:
produce fast,
avoid massive retakes,
avoid getting too attached to an animation too early,
and save your energy for the final versions.
But there's one rule that never changes: your V0 must be clean on the metrics, because everything else will be built on top of it.

Start from the Idle, Not a Blank Page
A gameplay walk begins in the idle.
The idle sets the structural constraints of the character: hips height, orientation, possible leg extension, weight distribution, center of gravity.
But it also sets the character's energy: a slow idle will give a slow walk, a tense idle will give a sharp walk, a frantic idle will give a dynamic walk. It's a system continuity.
The first thing I do before animating the walk is to go back to the idle pose and derive the contact pose from it.
From this base, the hips find their natural height, the step length follows, and the leg extension becomes consistent.
The energy of the idle guides the rhythm and the intention.
If you start from a blank page, you risk building a walk that doesn't connect cleanly with the character's resting state.
And blending will remind you immediately: hips too high, a style that no longer matches, it all shows.
Even in mocap, this coherence is essential.
Often, we record complete takes: idle → start → walk → stop.
But if you rework the idle to give it more personality, you have to stylize the walk in the same tone, otherwise you create a break in the character's energy.
The idle is your mechanical AND energetic anchor point. It's what ensures your walk integrates into the system, not just into Maya.

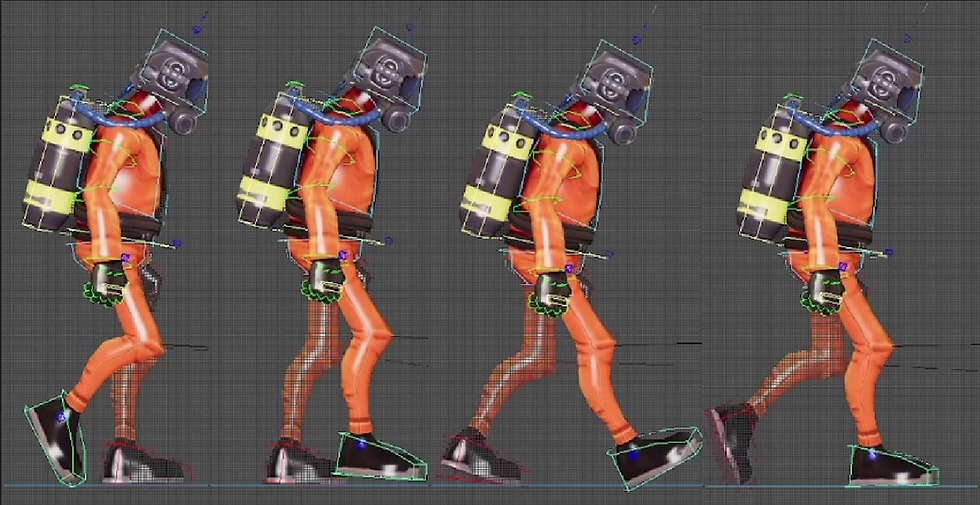
Build in Order: Lower Body First
Start with the lower body only : hips and legs, nothing else.
The goal at this stage is simple and precise:
set the key poses of the cycle,
calibrate the steps with the calculated speed,
verify that the leg extension is correct,
validate the rhythm in the engine.
No torso, no arms, no head. Until the lower body is validated in the engine, there's no point building anything else.
The reason is simple:
if you touch the hips after animating the torso, you redo the torso;
if you correct the step length after setting the arms, the arms become wrong;
if you adjust the cycle timing, the entire upper body shifts.
The lower body is the mechanical foundation. Everything else rests on it.
How I organize my layers at this stage
A layer for the root motion, which I activate or deactivate depending on whether I want to work in place or with displacement.
The BaseAnimation layer for the lower body key poses, to keep the structure clean and easy to revise.
A general attitude layer (the one that touches the whole body). This is where I set the torso intention, shoulder dynamics, gaze direction based on the idle pose.

Overlaps come last, because they add offset keys and make retouches much more precise.
Until the lower body is validated, I keep the structure simple and clean.
All of the above applies in keyframe. But in mocap, the principles are the same, it's the workflow that changes.
You don't build the poses, you select and calibrate them.
The iteration logic, respecting the metrics, all of that holds.
What changes is the speed of execution… and the pitfalls specific to capture.
Mocap Method: Fast, but Clean
In mocap, a clean walk can be built in about fifteen minutes. But only if the take is good, and knowing how to recognize a good take is already half the work.
What you're looking for: two regular steps, at constant speed, without parasitic movement.
No head looking elsewhere, no hips dropping more on one step than the other, no acceleration or deceleration in the cycle.
Regularity and neutrality are the two absolute criteria.
Once the take is found, the workflow is simple.
Cut at the passing pose.
Create a layer.
Paste the opening pose at the end to close the loop.
Generally the walk drifts slightly, the mocap take is never perfectly calibrated to the actual speed.
So you take the key of the foot at ground contact, copy it, and paste it at the moment the foot leaves contact. The goal: have the same key on the layer at both entry and exit of contact.
If the take was clean, this guarantees the foot doesn't slide and the cycle holds.
Even in mocap, the speed calculation remains essential. The real difficulty is delivering the animation at a speed the capture didn't anticipate.
For example, on Ghost Recon, even capturing real military personnel, the walk was too soft for the game's speed. We lengthened the steps and accelerated the rhythm, while keeping the upper body stable to avoid a frantic effect.
The Hips: The Most Subtle Decision
It conditions everything, and it's the hardest to calibrate.
Too high: the legs are too straight, the cycle lacks naturalness.
Too low: the legs are too bent, the character seems heavy and contracted.
Too much vertical movement: bouncing ball effect.
Too much rotation: the character's personality goes in a direction the rest of the moveset won't be able to follow.
The hips is the mechanical pivot of the cycle.
And behind every hips adjustment, there's a direct consequence on the torso. The torso always counter-balances. If the hips rotates left at the push moment, the torso compensates right. Touch one, and you have to revise the other.
On mocap retargets, you often see the hips lowered to compensate for legs that are too straight after transfer. It's a classic mistake.
By lowering the hips to hide the extension, you lose the sensation that the foot is actually pushing into the ground. The character has no weight.
The right correction isn't in the hips height, it's in the leg poses themselves: angles, extension, timing of the push.
One centimeter too many, and everything changes.
That's why the walk is the most subtle animation in the moveset.
The hips is a millimetric adjustment: one centimeter too high, too low, too far forward or backward, and the entire dynamics of the cycle shifts.
Giving the Impression of Speed
A gameplay walk is not realistic. It's credible. That's not the same thing.
In production, it frequently happens that the speed imposed by the metrics is lower than what the gameplay should feel like. The character moves at a certain speed, but the player needs to feel like they're making an effort, going fast, being reactive.
The solution isn't to cheat on the speed, it's to amplify the reading of effort in the animation: more marked poses, stronger arm amplitude, torso slightly tilted forward.
You simulate the sensation of effort without exceeding the actual speed.
But it's subtle: if you push too hard, the character looks like they're working enormously without going anywhere, like they're "spinning their wheels."
The animation and the engine speed no longer tell the same story, and that's the incoherence the player feels immediately.
On Prince of Persia: The Lost Crown, we spent weeks finding the right running speed for Sargon. He couldn't run too fast, but he could never seem soft.
The result: in the animation, he makes more effort than his actual displacement justifies. The arms push a bit more, the torso engages more, the internal rhythm is tighter. This "cheat" is an artistic reading of effort, calibrated for gameplay.
Every animator worked on it at some point, and it was ultimately the lead character animator who found the right compromise.
This kind of calibration isn't guessed, it's tested, discussed, refined collectively.
A gameplay walk is a constructed illusion. And building that illusion intelligently is a skill you learn in the field, not from tutorials.
But calibrating perceived speed isn't enough. There's another dimension you simply cannot see in your DCC: what the engine does to your animation once it's in the game. And that's often where the real surprises happen.
Understanding the Real Frequency of Engine Transitions
What you see in Maya has nothing to do with what happens in the game.
In Maya, you watch your walk as an isolated animation, in a clean, stable, controlled context.
In the engine, it becomes a state traversed constantly, sometimes several times per second, interrupted, restarted, blended, cut in the middle of a pose.
That's where many "correct" animations suddenly become problematic.
In real conditions, the walk is rarely played start to finish. It's called from a micro-movement of the stick, interrupted by a stop, restarted by a start, blended toward a turn, recalculated with every direction change.
The walk animation itself isn't the problem. It's the frequency at which it's triggered. A movement that works perfectly once can become overwhelming, repetitive, or incoherent when played fifty times per minute.
That's exactly what happened on Beyond: Two Souls. We had a walk where Jodie raised her arms. In Maya, it was beautiful, consistent with the scene. But in the engine, starts and stops triggered very frequently from that state. Her arms went up and down in a loop, like an involuntary nervous gesture. A charming detail in isolation became a tic once it was repeated dozens of times in a play session.
When you build a walk, you can't just ask whether it's correct, beautiful, or consistent.
You have to imagine what it becomes when it's interrupted every half-second, when it's constantly blending, when the player spams the stick, when transitions trigger more often than expected.
It's a question of spam tolerance, resistance to micro-transitions, coherence in a real input flow.
In production, you quickly realize that the problem is never the walk itself — it's what the engine puts it through.
Red flags
🚩 The hips was lowered to hide legs that are too straight → Loss of weight, artificial cycle.
🚩 The character feels "soft" or "jittery" → Perceived speed is inconsistent with actual speed.
🚩 The upper body was animated before the lower body was validated → Everything will need to be redone.
🚩 The walk was polished too early → Impossible to adapt when metrics change.
🚩Idle and walk don't tell the same energy → Visible break in transitions.
🚩 The cycle works in Maya but not in the engine → Systemic problem: speed, transitions, angles, input spam.
🚩The walk becomes overwhelming or repetitive in-game → Detail too strong, triggered too often (e.g. Jodie's arms in Beyond).
Conclusion
Building a gameplay walk means building a resilient, systemic, adaptable animation, one that will survive the inevitable changes of a project: metrics that shift, transitions that come later, design decisions that evolve until the final sprint.
A gameplay walk is not validated in Maya. It's validated in the real system: speed, transitions, angles, readability, the way it responds when the player changes intention every half-second.
The walk is one of the hardest animations to do in keyframe, every element conditions four others, subtlety is unforgiving, and it only validates in a context you never fully control at the time you create it.
But when it's solid, everything that comes after is too.
A robust walk means weeks of retakes saved. It's a player who feels control without ever consciously noticing it. It's a moveset that holds when you connect the starts, the stops, the turns, the actions.
And it's proof that you've understood something essential: in gameplay animation, you don't make animations. You negotiate behaviors.
Download the PDF — Building a Robust Walk (Essentials section)
4 pages for clean walk production: checklist, tests, red flags, cycle calculation.
A clear, professional, actionable tool to keep close when you're animating a walk.

Comments