How to Create a Readable Silhouette in Gameplay Animation
- Vanessa

- Feb 24
- 17 min read
Updated: Mar 2
You spend three hours on an attack pose.
The fingers are perfect, the expression hits hard, the fabric folds are clean.
You’re happy with it. You send it for review.
The lead replies: “I can’t tell where the attack is going.”
You look at your pose. In close‑up, facing the camera, it works.
But in reality… it was never designed to be read in gameplay conditions.
In gameplay, a pose doesn’t exist in a controlled frame. It exists ten meters away, from any angle, in motion, buried under VFX, enemies, and chaos.
It has to survive the player’s camera , not your viewport.
If your silhouette is only readable when paused, full‑screen, and from the perfect angle… it’s not gameplay


The February challenge was to create a pose board for your demo reel.
Now I’m going to show you how I make sure a pose stays readable in production , even in the worst conditions.
No theory. Just the tools I use every day.
In this article:
the silhouette test (and how I use it continuously)
shape language
the line of action
my layer‑by‑layer posing workflow
handling 360° in production
weapons: the silhouette game‑changer
the 5 challenge actions: pitfalls and solutions
maintaining readability in animation
troubleshooting: when your silhouette doesn’t work
The silhouette: your primary language in gameplay
As I explained in detail in the previous article, the silhouette is the player’s first language. It’s what allows them to recognize an action, an intention, or a role in a fraction of a second.
From the very beginning of video games, the silhouette was already at the center of everything.
The first sprites had no textures, no details, no shaders , just a few pixels to convey an intention.
The heroes of that era , Link, Sonic, Mario , were designed to be instantly recognizable, even on a tiny screen.Their silhouette was already telling a story long before the technology allowed anything more.
Today, in gameplay, everything moves fast, everything overlaps, everything competes for attention. If your pose isn’t readable at a distance, from an unexpected angle, in the middle of VFX and chaos, it doesn’t serve the player.
And that’s where many animators get lost: they add details, complicate things… until they create visual noise. A clear silhouette, on the other hand, reduces retakes, smooths communication between disciplines, and speeds up approvals.
One last essential point: not all poses need the same level of readability. It’s important to understand this right away:
An idle can be subtle, with small, discreet micro‑movements. Readability matters, but it doesn’t need to be explosive.
An attack MUST be instantly recognizable — even from 15 meters away, even in motion. Here, readability is non‑negotiable.
A hit react must communicate the direction of the impact in just a few frames. Absolute clarity required.
A walk can afford more nuance, because it stays on screen longer.
Adjusting your level of exaggeration and clarity depending on the gameplay importance of the action is one of the keys to professional production.
Now that this foundation is set, we can move on to what really matters here: the method for building a gameplay silhouette that’s readable, reliable, and reproducible
The silhouette test: a core habit for gameplay animators
You already know the silhouette test. It’s not a revelation, nor a secret technique , just an animator’s reflex. One of those habits that saves hours of retakes and keeps you from fooling yourself with lighting
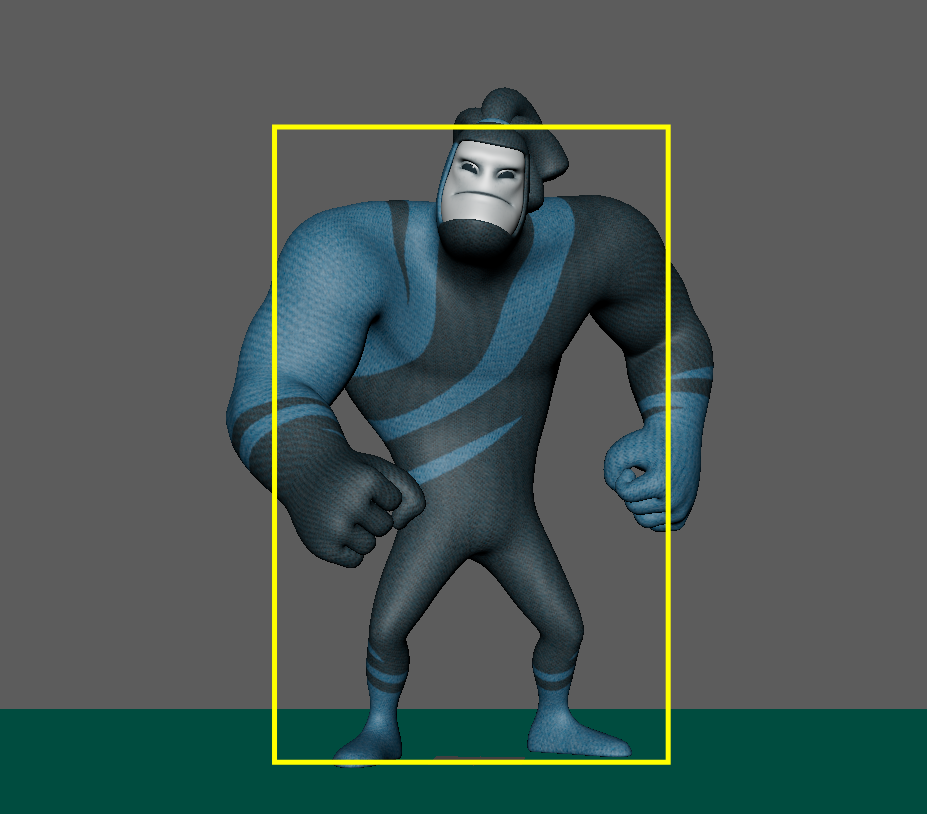
In any 3D software, the principle is the same: you turn off the lights, switch your character to black, and look at what remains : the shape, the intention, nothing else. If the black silhouette doesn’t clearly communicate the action, the pose isn’t there yet.
No matter the software, the goal is always the same: to see the pure shape, without lighting or textures.
Maya: Viewport → Lighting OFF → black Material Override
Blender: Solid → Flat → black matcap
MotionBuilder: lights off + black shader
Any 3D software: kill the lights, simplify the shape
The goal: a readable silhouette, not a render
And if you don’t have any 3D tools on hand, paper is enough: sketching the silhouette in five minutes forces you to think in simple shapes and validates readability before you invest any time.


Personally, I always keep a split viewport:
on the left, the normal view ; on the right, the pure silhouette.
I switch between the two constantly while posing. It keeps me from falling in love with a detail that won’t survive at ten meters.
And for validating an important pose, I use an even simpler test: I take a screenshot of the black silhouette and send it to someone with zero context.
One question: ‘What is the character doing?’
If the answer comes instantly, great. If they hesitate, guess something else, or reply with ‘uh…’, it means the silhouette still needs a bit of tightening
There’s nothing new about this test.
But the animators who use it systematically level up far faster than those who trust only their lit viewport.
The language of shapes: how to talk to the player’s brain
Before I even start posing a character, I like to ask myself:
‘Which shape tells this idea the best?’
Shape language is a fundamental tool I use systematically.
We’re talking about very simple visual psychology: the player’s brain reads shapes before details, before textures… and sometimes even before the animation itself
And the convenient thing is that this language relies on three families you’ve known since kindergarten.
The 3 primary shapes
🔵 Circles and curves
Suggest: softness, fluidity, dynamism, friendliness
Used for: fluid movements, dodges, agile characters
In posing: arched backs, rounded shoulders, natural curves

🟦 Squares and rectangles
Suggest: strength, stability, robustness, grounding
Used for: tanks, powerful characters, grounded poses
In posing: broad shoulders, stable hips, a compact silhouette
🔺 Triangles
Suggest: aggressiveness, speed, danger, direction
Used for: attacks, threats, explosive movements
In posing: sharp angles, pointed directions, spikes

Concrete application on the challenge
Signature attack → dominant triangles (explosive energy toward a point)
Dash/Dodge → curves + triangles (fluidity + speed)
Jump → tall vertical shape (extension)
Hit react → broken shapes (stability destroyed)
Charge → compressed squares (contained power)
The basics: line of action and simple shape
The mistake I see all the time is juniors starting with details before laying down the fundamentals.
The result: a technically correct pose… but unreadable.
And in gameplay, an unreadable pose is useless.
To build a clear silhouette, you only need two pillars:
The line of action (the main direction of the movement)
The simple shape (the overall geometry of the body)
The line of action: a single curve that tells the whole story
The line of action is the dominant curve running through your character, showing where the energy is going.
Quick test: if you had to draw ONE single line that captures the essence of your pose, what would it be?
If you need three lines to ‘explain’ it → your pose is confused

A blurry line of action leads to a blurry action
Examples for the challenge:
Attack: the line starts from the back foot, travels through the torso, and explodes toward the weapon
Dash: the line is horizontal, stretched like an arrow
Jump: the line is vertically ascending or arched
Hit react: the line breaks, a clean snap at the point of impact
Charge: the line pulls back, compressing the energy like a spring
The simple shape: block in the masses before the details
Before the fingers, the hair, the accessories… establish the overall mass.
Test question: ‘If I simplify my character into boxes (head, torso, hips, etc.), is the action already readable?’
If yes → you have a solid foundation.
If not → the pose doesn’t work, and details won’t save it

My posing workflow:
A readable gameplay silhouette never appears fully formed.
It’s built in layers, moving from the most important to the most refined.
And most importantly: I never move to the next step until the silhouette is clear from a distance and from multiple angles.
Here’s how I actually build a silhouette in production:
1. The torso first: root, COG, chest
I always start from the center:
root → COG → torso.
This is where the weight, balance, and overall direction live.
If this foundation isn’t clear, nothing else will be.
2. The legs very early (often in IK)
I place the legs right after the torso, not at the end.
Why?
Because the legs immediately readjust:
• the balance
• the height of the hips
• the direction of the weight
• the stability of the pose
In gameplay, the legs are often in IK (ground contact), which lets me lock the physical base of the pose very quickly.
At this stage, I’m already checking the silhouette
3. The arms next (often in FK)
The arms play a huge role in the silhouette:
they create lines, arcs, directions, and negative spaces.
That’s why I pose them in FK as soon as possible:
FK gives me fine control over curves, angles, and tension.
I’m not looking for details yet , just the overall shape, direction, and readability.
Silhouette check. Always
4. The head: small, but decisive
The head is tiny in the silhouette, but it communicates a lot:
• confident
• wary
• aggressive
• submissive
• determined…
Even without facial expression, the tilt of the head changes everything.
I place it at this stage, once the body is already readable.
Silhouette/distance check.
5. The hands (without the fingers first)
The hands are signposts.
They indicate intention, direction, and energy.
I block them in before the fingers, using simple shapes.
Just the overall form, orientation, and readability.
Another silhouette check.
6. Details last: fingers, hair, clothing
I only move to details once the silhouette works from a distance, from multiple angles, and in full black.
• fingers
• clothing
• accessories
• subtle asymmetries
These details enrich the pose, but they should never define it.
7. Checking at every step (not just at the end)
This is the point many animators forget:
I test the silhouette at every step, not only when everything is posed.
With every addition, I check:
• camera distance
• gameplay angle
• full‑black silhouette
• immediate readability
If a step breaks the silhouette, I fix it before moving on.
This workflow works because it follows the natural order of visual reading , and, more importantly, it prevents you from wasting time on details that won’t survive at ten meters of distance.
Simple shapes create visual contrasts:
Compression vs. extension (charge vs. attack)
Closure vs. openness (defense vs. offense)
Verticality vs. horizontality (jump vs. dash)
The 360° trap: your pose must work from every angle
In gameplay, most of the time the player can control the camera.
You don’t choose the angle. The player does.

How I handle 360° readability in production
Rule 1: Identify the key angles first
Even if your pose has to work at 360°, some views are more critical depending on the type of game
TPS (back view, rear 3/4):
This is the angle you’ll see 90% of the time.
The shoulder line must communicate direction.
The hips must indicate the weight.
The arms must remain visible even from the back (otherwise, goodbye readability).

Narrative game (close camera, varied angles):
Here, the camera moves a lot.
The side silhouette is often the most readable.
The 3/4 view must be clear: chest openness, direction, intention.

Beat’em up / action (side camera):
The profile is king.
The body must be readable in 2D.
Depth must be suggested (front/back of the legs).

Tip:
Identify the 2–3 angles that appear most often in your target game, and make sure your pose absolutely shines from those angles.
For the others, it just needs to work , not be perfect.
We make compromises.
Sometimes a pose that looks explosive in profile will be less clear from the front. That’s normal. What matters is prioritizing the angles that matter for your gameplay.
Rule 2: Separation of masses (negative space)
The most common trap: limbs sticking to the body and disappearing into the silhouette.
Classic mistakes:
• arm pressed against the torso → invisible in profile
• legs too close together → stick‑figure silhouette
• hand in front of the face → intention hidden
• weapon merging with the body → direction unreadable
Solution: create negative space.
These white gaps in your black silhouette are your friends. They allow the player’s brain to instantly understand what’s happening.
Visual test: Look at your black silhouette and count the negative spaces.
If there are none… spread the limbs.( The character won’t get offended.)

Gameplay readability isn’t about beauty, detail, or realism. It’s about instant legibility, from any angle, in any situation.
And 360° readability + mass separation is what turns a ‘pretty’ pose into a gameplay‑ready pose.
The weapon or prop: the silhouette game‑changer
A pose without a weapon and a pose with a weapon are two completely different readability challenges. The weapon changes absolutely everything: the read, the direction, the balance, the silhouette.
The problem:
The weapon often becomes:
• the most important element of the silhouette (it’s the thing that attacks)
• the most cumbersome element (it hides the body)
• the hardest element to read (orientation, length)
In short: if you don’t handle the weapon properly, your pose falls apart.
Rule 1: The weapon must ALWAYS be separated from the body.
If your sword, staff, or rifle blends into the torso or legs in the silhouette, the player loses all understanding: where it is, where it’s going.
Keep the weapon away from the body, even if it means slightly distorting the anatomy.
In fast motion, no one will notice the distortion. But everyone will notice the confusion if the weapon disappears.

Rule 2: The body adapts to the weapon, not the other way around.
Classic mistake: posing the body ‘correctly,’ then placing the weapon and realizing it ruins the silhouette.
Pose the weapon FIRST (its final position in the action), then build the body AROUND it to maximize readability.

Rule 3: The weapon defines the direction.
In an attack, the weapon usually carries the clearest line of action. The body follows, but the weapon leads.
Hide the body, keep only the weapon. Is the attack direction obvious? If yes, you’re good.

Weapon types, readability challenges
Each weapon comes with its own traps.
Long weapons: longsword / spear
Advantage: clear line
Trap: can cut through the body silhouette
Solution: diagonal angle , never perfectly vertical or horizontal (too much risk of visual collision).

Short weapons: sword / hammer / dual daggers…
Advantage: they don’t block the body
Trap: they can disappear inside the silhouette if kept too close
Solution: spread the arms, create opposing angles.

Firearms / bow
Advantage: recognizable shape
Trap: the arms often form a confusing block in front of the torso
Solution: open the posture, spread the elbows, show the weapon in profile.

Transforming weapons (foldable, extendable)
Ultimate trap: the silhouette changes depending on the weapon’s state
Solution: define a ‘signature shape’ for each state and stay consistent
In gameplay, the weapon is not an accessory. It’s a main actor in the silhouette.
It can clarify a pose… or destroy it
The 5 actions of the challenge: traps and solutions.
If you’re making your demo reel
In production, teams often spend a lot of time exploring, selecting, validating, and locking a coherent set of poses that define the character.
Depending on the project, team size, art direction, and type of game, this phase can be longer or shorter, because everyone needs to align before moving forward in the same direction.
But for the challenge I’m giving you , focused on poses , it’s different.
You can move much faster while still respecting the fundamental principles:
You must know your character before animating.
You must explore their posing possibilities before animating.
This is not a step you can skip to ‘save time.’
If you want to create a solid, believable, and coherent character for your demo reel, you must go through this exploration phase , even in a condensed version.
1. Signature attack
Goal: make the power and direction readable in ONE single pose.
Trap: trying to show everything (anticipation + impact + recovery) in one image.
Solution: choose the most iconic moment.
Usually: the impact (full extension) or the extreme tension point just before impact.
Common mistake: attack too symmetrical.The energy must be biased toward the attack direction.
Silhouette checklist:
✅ Attack direction = clear arrow
✅ Weapon separated from the body (clean shape)
✅ Visible tension (body compressed OR extended, never neutral)
✅ Shape language = dominant triangles.
2. Dash / Dodge
Goal: communicate speed in a single frozen pose.
Trap: a pose that looks like someone leaning… not someone bursting forward.
Solution: extreme horizontality + imbalance.
Common mistake: dash too ‘clean,’ too vertical.In reality, a dash defies gravity.The body MUST be off‑balance, almost falling forward.
Draw a horizontal line across the middle of your silhouette.It should dominate all other lines.
Dodge vs Dash: Dash = pure horizontal line, the whole body moves in ONE direction
Dodge = twist: upper body avoids one way, lower body the other.
Silhouette checklist:
✅ Body tilt: at least 45°
✅ Legs apart (movement suggested)
✅ Arms trailing or in opposition
✅ Line of action = dominant horizontal arrow
✅ Shape language = curves (fluidity) + triangles (speed).
3. Jump / Landing
Goal: convey height or impact in a single static pose.
JUMP (apex):
Trap: looks like someone standing on tiptoes.Solution: maximum extension.
Silhouette checklist:
✅ Vertically stretched body (legs extended, arms reaching upward)
✅ Tall, elongated silhouette
✅ Vertical upward line of action
✅ Shape language = slender vertical rectangle
LANDING:
Trap: too light, no impact felt.
Solution: compression.
Common mistake: a landing that lacks weight.
If your character is a tank, they must CRASH into the ground, not simply touch down.
Compare the character’s height in the jump vs the landing. The landing must be visibly lower (readable compression).
Silhouette checklist:
✅ Compressed body (bent knees, low hips, leaning torso)
✅ Weight pushed into the ground (legs apart to absorb impact)
✅ Arms:• trailing / open if the character is still in the air• downward / spread at contact to stabilize
✅ Shape language = wide, low, squashed square.
4. Hit React
Goal: show the direction of the incoming hit.
Trap: a generic ‘ouch’ reaction that doesn’t indicate where the impact came from.
Solution: the break in the body reveals the source.
Directional examples:
• Frontal hit: torso recoils, head snaps back, arms rise (reflex protection)
• Side hit: torso bends sideways, opposite leg lifts (loss of balance)
• Top‑down hit: body collapses, knees buckle, head drops
Common mistake: hit react too symmetrical. The body must be broken, off‑balance, losing stability. If it stays stable, it wasn’t really hit.
Isolate the impact zone and exaggerate its recoil. In silhouette, it must be brutal and obvious.
Silhouette checklist:
✅ Impact zone visibly pushed back
✅ Rest of the body follows in drag
✅ Clear imbalance (weight shifts, feet lift)
✅ BROKEN line of action (sharp break)
✅ Shape language = broken angles + strong asymmetry.
5. Charge / Anticipation
Goal: show that an explosion of energy is imminent.
Trap: looks like someone simply crouching.
Solution: compression + suggested direction + visible tension.
Common mistake: ‘soft’ anticipation.The body must be wound up like a spring. Every muscle should suggest the coming explosion.
When you look at your silhouette, do you feel the urge to see what happens next (the release)?If not, you haven’t compressed enough.
Difference between charge vs crouch:
Crouch = neutral, no direction
Charge = clear direction, the whole body aims at something
Your character must aim, even subtly (shoulder rotation, front foot pointing, gaze).
Silhouette checklist:
✅ Compressed body (low hips, leaning torso, bent legs)
✅ Suggested future direction (rotated shoulders, fixed gaze, arms pulled back)
✅ Asymmetry (one side loads, the other anchors)
✅ Line of action pulled backward (energy compressed)
✅ Shape language = tense, squashed squares.
Silhouette and animation: maintaining readability in motion
A single pose is great. But in animation, the real challenge is staying readable frame after frame.
The critical frames to validate
In production, I do NOT check every frame in silhouette.
I focus on the key poses ,the ones that carry the readability of the movement:
For an attack, for example:
• Extreme anticipation (maximum compression)
• Point of no return (just before the release)
• Impact (full extension)
• Follow‑through (the body finishes the motion)
These 4 frames MUST be perfect in silhouette.The transitions between them can be softer , the motion itself will guide the eye.

Rhythm variation = readability
To keep the silhouette readable in motion, you must play with rhythm:
• hold the important poses
• speed up the transitions
This contrast is what allows the player to read the action.
Example:
• Anticipation: hold
• Transition → Impact: fast
• Impact: hold
• Recovery: shorter hold
The key poses stay on screen long enough to be read. The in‑betweens pass quickly, so their imperfect silhouette doesn’t matter.
Every frame must contribute
If a frame adds nothing to readability or motion, it dilutes the impact.
At every step, I ask myself:‘Does this image strengthen the reading of the action, or does it muddy it?’
If it muddies it, I remove it or speed it up.
A clear animation is one where every frame has intention.
Realism vs Readability: the art of compromise
Let’s be honest: even in a realistic style, you have to exaggerate.
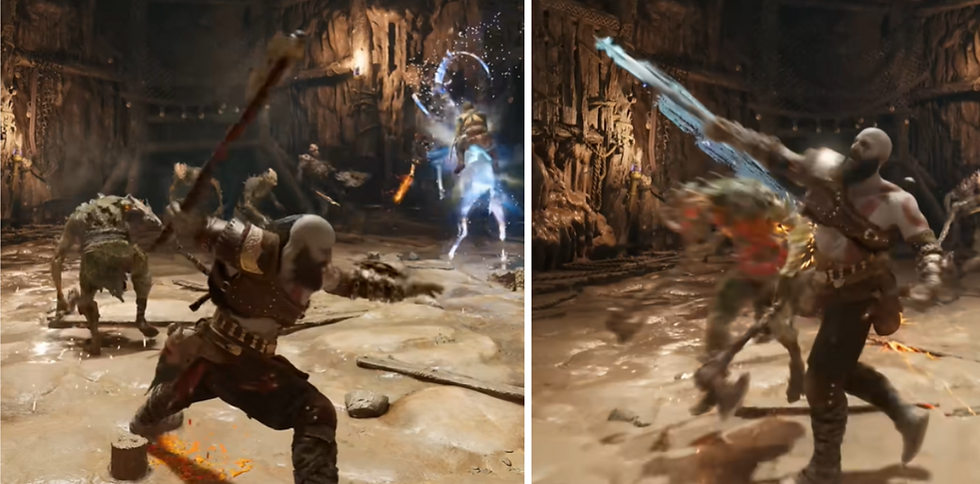
The Last of Us, Ghost of Tsushima, God of War…All these ‘realistic’ games use exaggerated poses for one simple reason: camera distance and action speed crush subtle details.
What looks realistic in a close‑up becomes invisible at 10 meters and loses all impact.
How far should you push exaggeration?
It depends on three things:
• the game’s style (realistic vs stylized)
• the art direction
• the gameplay importance of the action
Subtle idle = minimal exaggeration
Signature attack = strong exaggeration, even in a realistic style.
🚩 Troubleshooting: when your silhouette doesn’t work
Sometimes, even with the right intentions, certain poses just refuse to work.
Here are the most common issues… and how to fix them cleanly.
❌ 1. Readable from the front but not from the side
Cause: overlapping masses in depth.
Fix: spread arms/legs in Z‑space, add diagonal separation.
Check: top view → nothing should be aligned.
❌ 2. Your art director rejects exaggeration
Fix: talk about gameplay readability, not exaggeration.
Show two versions in gameplay conditions.Let the camera distance decide.
❌ 3. The weapon ruins the silhouette
Fix:
• change the weapon angle,
• or slightly deform it (invisible in motion),
• or pose the body around the weapon.
Rule: the weapon has silhouette priority.
❌ 4. Silhouette OK in static, unreadable in motion
Cause: transitions too long.
Fix:
• identify the 3–4 key poses,
• speed up the transitions,
• hold the important poses longer.
❌ 5. Correct anatomy vs readability
Fix: always choose readability.
The player won’t notice perfect anatomy but they’ll instantly feel an unreadable action.
Conclusion: the silhouette is your quality insurance.
The silhouette is your first readability filter ,your safeguard, your truth tool.
In the end, everything comes back to this: the silhouette.
Not the details, not the shaders, not the lovingly sculpted muscles.
The shape. The instant read.
The silhouette is what decides whether your intention lands or gets lost. Whether the player understands or hesitates. Whether your lead approves or asks for a redo. Whether you move forward or sink time into polish that won’t save anything.
A clear silhouette accelerates everything: validation, communication, gameplay, even your own workflow.
A muddy silhouette slows everything down.
The test is simple: turn off the lights. If the action is obvious, you’re on the right track.If you hesitate, rework it.
For this month’s challenge: five poses, five truths.
Attack, dash, jump, hit react, charge.
Five intentions that must read instantly , no excuses, no tricks.
Just the shape. Just the action. Just what you want to say.
Now turn off the lights. And pose
Download the PDF Gameplay Silhouette: Understand and Fix (Essentials section)
Everything you need to keep in mind when creating gameplay poses.
See you next week for the next challenge !
And this time, we dive into animation with gameplay idles !


Comments